概覽
此示例播放從Brightcove 回放 API,這是最新推薦的 API,用於從您的視頻雲庫中檢索內容。
對於此選項,您將需要原則金鑰。如果您不熟悉策略密鑰,請參閱策略 API 概述 .
開始使用
此範例會從內部視訊檔案陣列中播放視訊。
請依照下列步驟熟悉設定使用 iOS 版 Brightcove 播放程式 SDK 的應用程式專案。您可以檢視下列各項的完整程式碼:
有兩種方法可以嘗試這個範例:
下載範例
下載整個 Xcode 項目進行實驗。
- 克隆或下載適用於 iOS 示例的本機 SDK到您的本地系統。
- 導航到播放器/VideoCloudBasicPlayer/objc示例應用程序。
- 跑過
pod install命令。 - 開啟並執行新建立的工作區。
有關詳細信息,請參閱為適用於 iOS/tvOS 的本機 SDK 運行示例應用程序文檔。
依照本指南中的步驟建置應用程式
請依照下列步驟熟悉設定使用適用於 tvOS 的 Brightcove 播放程式 SDK 的應用程式專案。您可以檢視下列各項的完整程式碼:
建立專案
在 Xcode 中設置一個項目。然後將Brightcove Player SDK以及所有依賴項添加到項目中。
設置 Xcode 項目
為應用程序創建一個新的 Xcode 項目。
-
在 Xcode 中開始創建一個新的 iOS 項目。選擇創建一個新的 Xcode 項目 .或者,在 Xcode 頂部菜單中,您可以選擇文件 , 新的 , 項目 .
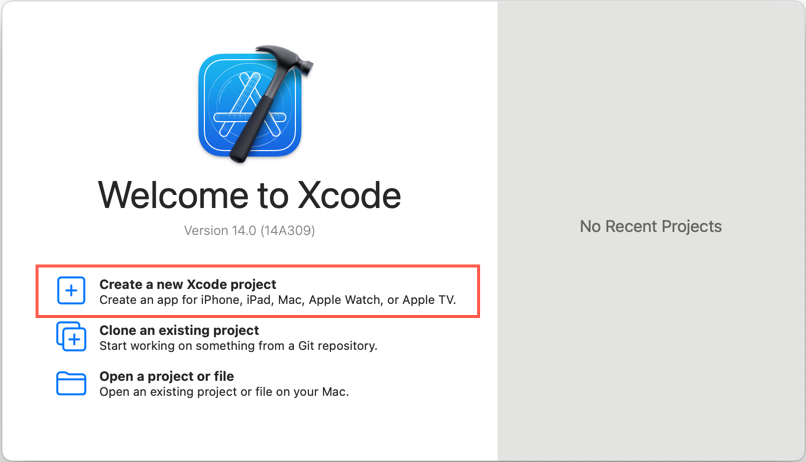
建立專案 -
為模板選擇 App ,然後單擊 Next 。
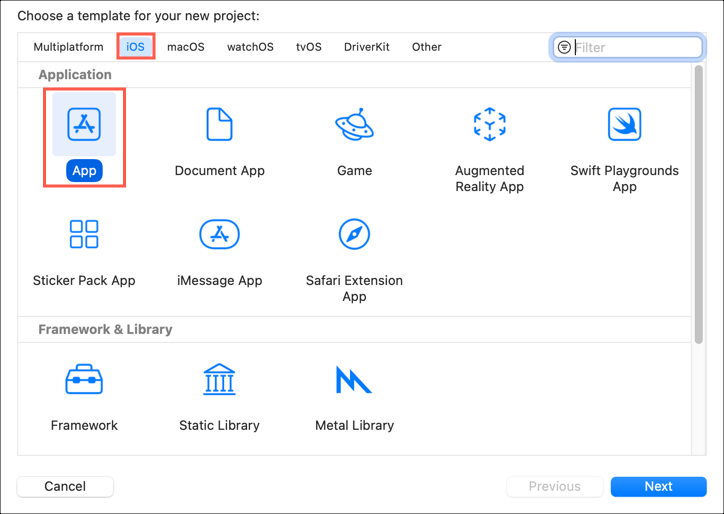
選擇專案範本 -
設定專案資訊,如下所示:
- 產品名稱:簡單影片播放
- 團隊:沒有任何
[專案團隊] 欄位是選擇性的。如果你想在 App Store 發佈你的應用程式,你需要透過 Apple 開發者計劃選擇你屬於的團隊。程式碼簽署需要群組名稱。在此範例中,我們將選取「無」。
- 組織標識符: com.example-公司
這使得產品名稱對於應用程序商店是唯一的。 - 界面:故事板
- 語言:目標-C
點擊下一個 .
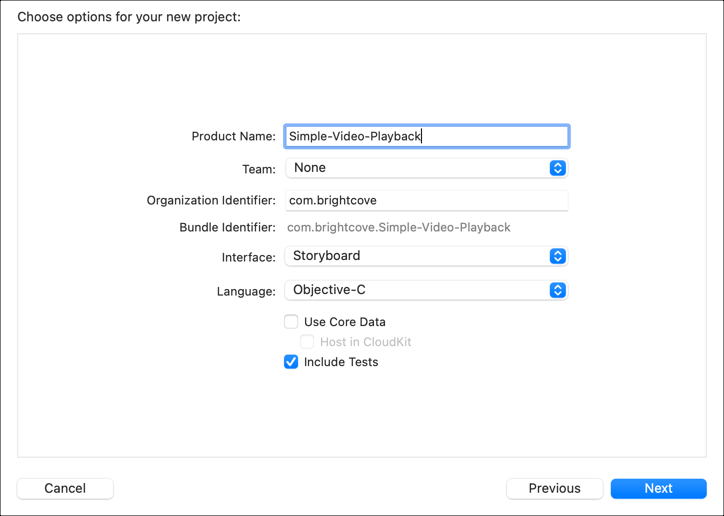
加入專案資訊 -
選擇您要保存項目的位置,然後單擊 創建。
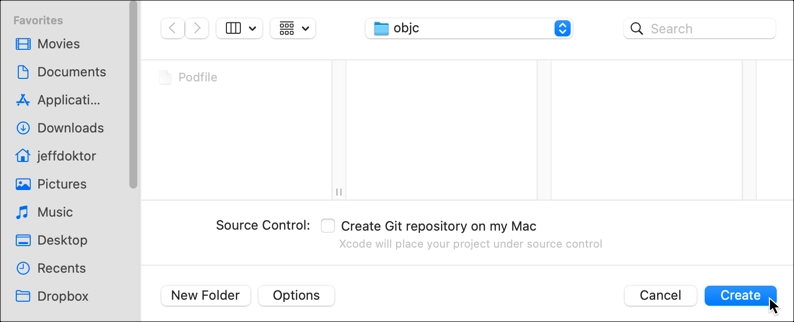
儲存專案 - 現在關閉項目(是的,關閉它-這很重要!)
將 SDK 及其依賴項添加到您的項目
將 SDK 及其依賴項添加到您的項目中的最簡單方法是使用 Cocoapods。
Cocoapods 是一個依賴管理器,將庫添加到您的項目中。它不是必需的,但使安裝更容易。要安裝 CocoaPods,請參閱可可豆地點。
-
在您的項目文件夾中,創建一個名為播客文件(沒有文件擴展名)。
-
使用文本編輯器,將以下代碼行添加到 Podfile 並保存它。此程式碼會執行下列作業:
- 第 1 行:指向 CocoaPods pod 規範的 GitHub 位置
- 第 2 行:指向 Brightcove pod 規範的 GitHub 位置
- 第4行:定義 iOS 平台版本
- 第 6 行:將 Pod 設置為使用框架而不是靜態庫
-
第 8-10 行:安裝 Brightcove 本機播放器 SDK
- 有關管理依賴項的更多信息,請參閱如何使用 CocoaPods 管理依賴關係文章。
source 'https://github.com/CocoaPods/Specs.git' source 'https://github.com/brightcove/BrightcoveSpecs.git' platform :ios, '16.0' use_frameworks! target 'Simple-Video-Playback' do pod 'Brightcove-Player-Core/XCFramework' end -
打開終端會話並導航到您的簡單視頻回放 Xcode 項目文件夾。

終端工作階段 -
在終端會話中,鍵入以下命令:
pod install並按下返回運行它。您應該會在終端中看到一系列訊息,指出 Brightcove 播放程式 SDK 已新增至您的專案。
-
這
pod install命令創建.xcworkspace文件為您的項目。請注意最後一行,這很重要 — 從這一點開始,您必須執行以下操作:
- 在 Xcode 中打開 Simple-Video-Playback.xcworkspace 文件
- 不要 使用 Simple-Video-Playback.xcodeproj 文件
編寫視訊應用程式
為簡單的視訊播放應用程式建立程式碼。
- 在 Xcode 中,打開簡單視頻播放.xcworkspace文件。
設定應用程式的音訊行為
音訊工作階段會處理應用程式層級的音訊行為。了解更多關於AVAudioSession班級。
對於這個示例,我們將使用AVAudioSessionCategoryPlayback .即使螢幕鎖定且「鈴聲/靜音」開關設定為靜音,也會播放音訊。為簡單起見,我們將為此代碼放入App Delegate中。
-
在您的項目中,打開 App Delegate 實現文件 ( AppDelegate.m ).
-
在裡面
didFinishLaunchingWithOptions方法,添加代碼以設置音頻會話類別。確保你導入AVFoundation框架。- 我們需要下面的代碼,以確保當我們期望音頻播放。舉例來說,如果沒有設定此代碼,靜音開關開啟時,我們就不會聽到視訊。
- 為了簡化示例,我們將其放入應用程序委託中。有關如何在您自己的應用程序中使用它的更多信息,請參閱音頻會話編程指南 .
//
//  AppDelegate.m
//  Simple-Video-Playback
//

#import "AppDelegate.h"
#import <AVFoundation/AVFoundation.h>

@interface AppDelegate ()
@end

@implementation AppDelegate

- (BOOL)application:(UIApplication *)application didFinishLaunchingWithOptions:(NSDictionary *)launchOptions {
    // Override point for customization after application launch.
    NSError *categoryError = nil;
    BOOL success = [[AVAudioSession sharedInstance] setCategory:AVAudioSessionCategoryPlayback error:&categoryError];

    if (!success)
    {
        NSLog(@"AppDelegate Debug - Error setting AVAudioSession category.  Because of this, there may be no sound. `%@`", categoryError);
    }
    return YES;
}

#pragma mark - UISceneSession lifecycle

- (UISceneConfiguration *)application:(UIApplication *)application configurationForConnectingSceneSession:(UISceneSession *)connectingSceneSession options:(UISceneConnectionOptions *)options {
    // Called when a new scene session is being created.
    // Use this method to select a configuration to create the new scene with.
    return [[UISceneConfiguration alloc] initWithName:@"Default Configuration" sessionRole:connectingSceneSession.role];
}

- (void)application:(UIApplication *)application didDiscardSceneSessions:(NSSet<UISceneSession *> *)sceneSessions {
    // Called when the user discards a scene session.
    // If any sessions were discarded while the application was not running, this will be called shortly after application:didFinishLaunchingWithOptions.
    // Use this method to release any resources that were specific to the discarded scenes, as they will not return.
}
@end
構建View Controller實現
更新View Controller實施以播放Brightcove目錄服務中的視頻。
-
在您的項目中,打開 View Controller 實現文件 ( 視圖控制器.m ).
導入Brightcove Player SDK頭文件
-
為Brightcove Player SDK添加以下導入語句:
@import BrightcovePlayerSDK;
使用您的價值自訂專案
添加令牌和播放列表ID值以訪問您的視頻雲帳戶。
此示例播放從Brightcove 回放 API,這是最新推薦的 API,用於從您的視頻雲庫中檢索內容。如果您不熟悉策略密鑰,請參閱策略 API 概述 .
-
以下
#import指令,為以下內容添加您自己的值:- 第 11 行:定義您的布萊特灣播放 API 原則金鑰。
- 第 12 行:定義您的視頻雲帳戶ID。
- 第 13 行:定義您的視頻雲視頻ID。
// ** Customize these values with your own account information **
static NSString * const kViewControllerPlaybackServicePolicyKey = @"your policy key";
static NSString * const kViewControllerAccountID = @"your account id";
static NSString * const kViewControllerVideoID = @"your video id";
宣告屬性
-
在“ ViewController接口”部分中,添加以下類聲明:
- 第 14 行:將 Brightcove 代表添加到
interface.這可讓您的應用程式聆聽和回應視訊播放事件。 - 第 16 行:定義了
BCOVPlaybackService類,它提供用於從 Playback API 檢索數據的異步方法。 - 第 17 行:定義了
BCOVPlaybackController,它具有控製播放功能的方法。 - 第 18 行:定義布萊特灣 UI 控件的播放器視圖。
- 第 19 行:定義視頻容器視圖。
@interface ViewController () <BCOVPlaybackControllerDelegate> @property (nonatomic, strong) BCOVPlaybackService *playbackService; @property (nonatomic, strong) id<BCOVPlaybackController> playbackController; @property (nonatomic) BCOVPUIPlayerView *playerView; @property (nonatomic, weak) IBOutlet UIView *videoContainer; @end - 第 14 行:將 Brightcove 代表添加到
定義初始化方法
-
在 ViewController 實現部分,定義一個
init調用一個函數setup您將在下一步中定義的函數。@implementation ViewController #pragma mark Setup Methods - (instancetype)initWithCoder:(NSCoder *)coder { self = [super initWithCoder:coder]; if (self) { [self setup]; } return self; }
設定播放器
-
以下
init函數,創建一個名為setup,在應用加載時調用。- 第 38 行:使用共用管理員來建立播放控制器。這
BCOVPlayerSDKManagerclass 是一個單例,允許您在 SDK 生態系統中創建其他對象。 -
40行:選用性:如果你覆蓋
BCOVVideo類或不使用 Brightcove 播放器和播放服務或目錄,您需要將您的視頻雲帳戶 ID 發送到視頻雲分析。這可讓您在視訊雲端分析中檢視此應用程式的資料。 - 第 42-44 行:設置代理並打開自動播放和自動播放功能。
-
第 46 行:使用您的帳戶ID和策略密鑰初始化播放服務。
- (void)setup { _playbackController = [BCOVPlayerSDKManager.sharedManager createPlaybackController]; _playbackController.analytics.account = kViewControllerAccountID; // Optional _playbackController.delegate = self; _playbackController.autoAdvance = YES; _playbackController.autoPlay = YES; _playbackService = [[BCOVPlaybackService alloc] initWithAccountId:kViewControllerAccountID policyKey:kViewControllerPlaybackServicePolicyKey]; } - 第 38 行:使用共用管理員來建立播放控制器。這
設定播放程式
-
在裡面
viewDidLoad函數執行以下操作:- 第54行:使用標準的 VOD 佈局,創建和設置布萊特灣播放器控制。
- 第 56 行:添加播放器視圖作為主視圖的子視圖。
- 第 57 行:關自動調整掩碼 .
- 第 58-63 行:使用「自動佈局」來定義播放器視圖的動態約束。
- 第 64 行:將播放器視圖分配給其關聯的全局變量。
- 第 67 行:將播放器視圖與播放控制器產生關聯。
-
第69行:調用
requestContentFromPlaybackService函數,您將在下一步中定義它。
- (void)viewDidLoad { [super viewDidLoad]; // Do any additional setup after loading the view, typically from a nib. // Set up our player view. Create with a standard VOD layout. BCOVPUIPlayerView *playerView = [[BCOVPUIPlayerView alloc] initWithPlaybackController:self.playbackController options:nil controlsView:[BCOVPUIBasicControlView basicControlViewWithVODLayout] ]; _videoContainer addSubview:playerView]; playerView.translatesAutoresizingMaskIntoConstraints = NO; [NSLayoutConstraint activateConstraints:@[ [playerView.topAnchor constraintEqualToAnchor:_videoContainer.topAnchor], [playerView.rightAnchor constraintEqualToAnchor:_videoContainer.rightAnchor], [playerView.leftAnchor constraintEqualToAnchor:_videoContainer.leftAnchor], [playerView.bottomAnchor constraintEqualToAnchor:_videoContainer.bottomAnchor], ]]; _playerView = playerView; // Associate the playerView with the playback controller. _playerView.playbackController = _playbackController; [self requestContentFromPlaybackService]; }
向布萊特灣圖書館索取內容
為了播放視頻內容,您將從視頻雲庫中請求視頻。
-
以下
viewDidLoad函數,創建一個名為requestContentFromPlaybackService如下:- (void)requestContentFromPlaybackService { [self.playbackService findVideoWithVideoID:kViewControllerVideoID parameters:nil completion:^(BCOVVideo *video, NSDictionary *jsonResponse, NSError *error) { if (video) { [self.playbackController setVideos:@[ video ]]; } else { NSLog(@"ViewController Debug - Error retrieving video: `%@`", error); } }]; }
檢視程式碼
視圖控制器實現現在已完成。這是完整的代碼:
//
// ViewController.m
// Simple-Video-Playback
//
#import "ViewController.h"
@import BrightcovePlayerSDK;
// ** Customize these values with your own account information **
static NSString * const kViewControllerPlaybackServicePolicyKey = @"your policy key";
static NSString * const kViewControllerAccountID = @"your account id";
static NSString * const kViewControllerVideoID = @"your video id";
@interface ViewController () <BCOVPlaybackControllerDelegate>
@property (nonatomic, strong) BCOVPlaybackService *playbackService;
@property (nonatomic, strong) id<BCOVPlaybackController> playbackController;
@property (nonatomic) BCOVPUIPlayerView *playerView;
@property (nonatomic, weak) IBOutlet UIView *videoContainer;
@end
@implementation ViewController
#pragma mark Setup Methods

- (instancetype)initWithCoder:(NSCoder *)coder
{
self = [super initWithCoder:coder];
if (self)
{
		[self setup];
}
return self;
}
- (void)setup
{
_playbackController = [BCOVPlayerSDKManager.sharedManager createPlaybackController];
_playbackController.analytics.account = kViewControllerAccountID; // optional
_playbackController.delegate = self;
_playbackController.autoAdvance = YES;
_playbackController.autoPlay = YES;
_playbackService = [[BCOVPlaybackService alloc] initWithAccountId:kViewControllerAccountID policyKey:kViewControllerPlaybackServicePolicyKey];
}
- (void)viewDidLoad {
[super viewDidLoad];
// Do any additional setup after loading the view, typically from a nib.
// Set up our player view. Create with a standard VOD layout.
BCOVPUIPlayerView *playerView = [[BCOVPUIPlayerView alloc] initWithPlaybackController:self.playbackController options:nil controlsView:[BCOVPUIBasicControlView basicControlViewWithVODLayout] ];
[_videoContainer addSubview:playerView];
playerView.translatesAutoresizingMaskIntoConstraints = NO;
[NSLayoutConstraint activateConstraints:@[
[playerView.topAnchor constraintEqualToAnchor:_videoContainer.topAnchor],
[playerView.rightAnchor constraintEqualToAnchor:_videoContainer.rightAnchor],
[playerView.leftAnchor constraintEqualToAnchor:_videoContainer.leftAnchor],
[playerView.bottomAnchor constraintEqualToAnchor:_videoContainer.bottomAnchor],
]];
_playerView = playerView;
// Associate the playerView with the playback controller.
_playerView.playbackController = _playbackController;
[self requestContentFromPlaybackService];
}
- (void)requestContentFromPlaybackService
{
[self.playbackService findVideoWithVideoID:kViewControllerVideoID parameters:nil completion:^(BCOVVideo *video, NSDictionary *jsonResponse, NSError *error) {

	if (video)
	{
		[self.playbackController setVideos:@[ video ]];
	}
	else
	{
		NSLog(@"ViewController Debug - Error retrieving video: `%@`", error);
	}

}];
}
@end
使用您的價值自訂專案
設定您的帳戶 ID 的值,將在稍後的步驟中傳送到 Brightcove。
-
以下
#import指令,為您的 Brightcove 帳戶 ID 添加您自己的值。這將用於向 Brightcove 註冊您的應用程序。// ** Customize these values with your own account information ** static NSString * const kViewControllerAccountID = @"your account id";
宣告屬性
-
在“ ViewController接口”部分中,添加以下委託和類聲明:
- 第 14 行:將 Brightcove 代表添加到
interface. - 第 16 行:定義了
BCOVPlaybackController,它具有控製播放功能的方法。 - 第 17 行:定義布萊特灣 UI 控件的播放器視圖。
-
第 18 行:定義視頻容器視圖。
@interface ViewController () <BCOVPlaybackControllerDelegate> @property (nonatomic, strong) id<BCOVPlaybackController> playbackController; @property (nonatomic) BCOVPUIPlayerView *playerView; @property (nonatomic, weak) IBOutlet UIView *videoContainer; @end - 第 14 行:將 Brightcove 代表添加到
定義初始化方法
-
在 ViewController 實現部分,定義一個
init調用一個函數setup您將在下一步中定義的函數。@implementation ViewController #pragma mark Setup Methods - (instancetype)initWithCoder:(NSCoder *)coder { self = [super initWithCoder:coder]; if (self) { [self setup]; } return self; }
設定播放器
- 以下
init函數,創建一個名為setup,在應用加載時調用。- 第37行:使用共享管理器創建播放控制器。這
BCOVPlayerSDKManagerclass 是一個單例,允許您在 SDK 生態系統中創建其他對象。 - 第39行:通過發送您的帳戶ID在Brightcove中註冊您的應用。
-
第41-43行:設置代表並打開自動前進和自動播放功能。
- (void)setup { _playbackController = [BCOVPlayerSDKManager.sharedManager createPlaybackController]; _playbackController.analytics.account = kViewControllerAccountID; _playbackController.delegate = self; _playbackController.autoAdvance = YES; _playbackController.autoPlay = YES; } - 第37行:使用共享管理器創建播放控制器。這
配置播放器並開始播放
-
在裡面
viewDidLoad方法執行以下操作:- 第50-53行:創建一系列視頻源。您將定義
videoWithURL在下一步中發揮作用。 - 第 56 行:使用標準的VOD佈局創建播放器視圖。
- 第 58 行:添加播放器視圖作為主視圖的子視圖。
- 第 59 行:關自動調整掩碼 .
- 第 60-65 號線:使用「自動佈局」來定義播放器視圖的動態約束。
- 66行:將播放器視圖與播放控制器產生關聯。
- 第69行:將視訊陣列新增至控制器的播放佇列。
-
第74行:開始播放第一個視訊。
- (void)viewDidLoad { [super viewDidLoad]; // create an array of videos NSArray *videos = @[ [self videoWithURL:[NSURL URLWithString:@"https://solutions.brightcove.com/bcls/assets/videos/Great_Horned_Owl.mp4"]], [self videoWithURL:[NSURL URLWithString:@"https://solutions.brightcove.com/bcls/assets/videos/Great_Blue_Heron.mp4"]] ]; // Set up our player view. Create with a standard VOD layout. BCOVPUIPlayerView *playerView = [[BCOVPUIPlayerView alloc] initWithPlaybackController:self.playbackController options:nil controlsView:[BCOVPUIBasicControlView basicControlViewWithVODLayout] ]; [_videoContainer addSubview:playerView]; playerView.translatesAutoresizingMaskIntoConstraints = NO; [NSLayoutConstraint activateConstraints:@[ [playerView.topAnchor constraintEqualToAnchor:_videoContainer.topAnchor], [playerView.rightAnchor constraintEqualToAnchor:_videoContainer.rightAnchor], [playerView.leftAnchor constraintEqualToAnchor:_videoContainer.leftAnchor], [playerView.bottomAnchor constraintEqualToAnchor:_videoContainer.bottomAnchor], ]]; _playerView = playerView; // Associate the playerView with the playback controller. _playerView.playbackController = _playbackController; // add the video array to the controller's playback queue [self.playbackController setVideos:videos]; // play the first video [self.playbackController play]; } - 第50-53行:創建一系列視頻源。您將定義
剩下的
-
以下
viewDidLoad函數,創建一個函數,為BCOVSources屬於視頻。- (BCOVVideo *)videoWithURL:(NSURL *)url { // set the delivery method for BCOVSources that belong to a video BCOVSource *source = [[BCOVSource alloc] initWithURL:url deliveryMethod:kBCOVSourceDeliveryHLS properties:nil]; return [[BCOVVideo alloc] initWithSource:source cuePoints:[BCOVCuePointCollection collectionWithArray:@[]] properties:@{}]; }
檢視程式碼
視圖控制器實現現在已完成。這是完整的代碼:
//
// ViewController.m
// Simple-Video-Playback
//
// Copyright © Brightcove. All rights reserved.
//
#import "ViewController.h"
// ** Customize these values with your own account information **
static NSString * const kViewControllerAccountID = @"your account id";
@interface ViewController () <BCOVPlaybackControllerDelegate>

@property (nonatomic, strong) id<BCOVPlaybackController> playbackController;
@property (nonatomic) BCOVPUIPlayerView *playerView;
@property (nonatomic, weak) IBOutlet UIView *videoContainer;

@end
@implementation ViewController
#pragma mark Setup Methods

- (instancetype)initWithCoder:(NSCoder *)coder
{
self = [super initWithCoder:coder];
if (self)
{
	[self setup];
}
return self;
}
- (void)setup
{
_playbackController = [BCOVPlayerSDKManager.sharedManager createPlaybackController];
_playbackController.analytics.account = kViewControllerAccountID; // optional
_playbackController.delegate = self;
_playbackController.autoAdvance = YES;
_playbackController.autoPlay = YES;
}
- (void)viewDidLoad {
[super viewDidLoad];
// Do any additional setup after loading the view, typically from a nib.
// create an array of videos
NSArray *videos = @[
[self videoWithURL:[NSURL URLWithString:@"https://solutions.brightcove.com/bcls/assets/videos/Great_Horned_Owl.mp4"]],
[self videoWithURL:[NSURL URLWithString:@"https://solutions.brightcove.com/bcls/assets/videos/Great_Blue_Heron.mp4"]]
];
// Set up our player view. Create with a standard VOD layout.
BCOVPUIPlayerView *playerView = [[BCOVPUIPlayerView alloc] initWithPlaybackController:self.playbackController options:nil controlsView:[BCOVPUIBasicControlView basicControlViewWithVODLayout] ];
// add the view as a subview of the main view
[_videoContainer addSubview:playerView];
playerView.translatesAutoresizingMaskIntoConstraints = NO;
[NSLayoutConstraint activateConstraints:@[
[playerView.topAnchor constraintEqualToAnchor:_videoContainer.topAnchor],
[playerView.rightAnchor constraintEqualToAnchor:_videoContainer.rightAnchor],
[playerView.leftAnchor constraintEqualToAnchor:_videoContainer.leftAnchor],
[playerView.bottomAnchor constraintEqualToAnchor:_videoContainer.bottomAnchor],
]];
_playerView = playerView;
// Associate the playerView with the playback controller.
_playerView.playbackController = _playbackController;
// add the video array to the controller's playback queue
[self.playbackController setVideos:videos];
// play the first video
[self.playbackController play];
}
- (BCOVVideo *)videoWithURL:(NSURL *)url
{
// set the delivery method for BCOVSources that belong to a video
BCOVSource *source = [[BCOVSource alloc] initWithURL:url deliveryMethod:kBCOVSourceDeliveryHLS properties:nil];
return [[BCOVVideo alloc] initWithSource:source cuePoints:[BCOVCuePointCollection collectionWithArray:@[]] properties:@{}];
}
- (void)didReceiveMemoryWarning {
[super didReceiveMemoryWarning];
// Dispose of any resources that can be recreated.
}
@end
連接故事板檢視
連接Main.storyboard查看與videoContainer財產。
-
在 Xcode 中,打開
Main.storyboard文件。 -
在配套視圖中,展開查看控制器場景然後是視圖控制器菜單顯示看法目的。
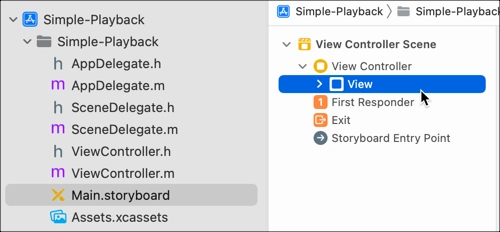
故事板視圖” -
點擊在右側添加編輯器,並打開
ViewController.m文件。
添加編輯器 -
選擇旁邊的空心圓圈
@property為了videoContainer, 並將其拖至看法對象來連接這些組件。
連接視圖
管理媒體安全性
應用程式傳輸安全性 (ATS) 會強制您的應用程式和 Web 服務之間的安全連線。隨著 Apple 發布 iOS 9 SDK,一個名為應用程序傳輸安全 (ATS)加入。
-
下列其中一種情況將適用於您的應用程式:
-
根據預設,iOS 版 Brightcove 原生 SDK 會使用來源選擇原則,透過 HTTP 來源選擇 HTTPS,因此您可以在啟用 ATS 的情況下建置應用程式。
就是這樣,你已經準備好運行你的應用程序。
-
如果您的遠端資產使用 HTTPS 而非 HTTP 來源,則您可以在啟用 ATS 的情況下建置應用程式。
就是這樣,你已經準備好運行你的應用程序。
-
如果您正在使用 HTTP 來源或應用程式中有其他 HTTP 呼叫,您可能會遇到下列錯誤訊息:
App Transport Security has blocked a cleartext HTTP (http://) resource load since it is insecure.
Temporary exceptions can be configured via your app's Info.plist file.
這表示 ATS 已啟用,但您的系統未設定為符合 ATS 需求。要解決這種情況,請參閱使用應用程序傳輸安全 (ATS)文檔。
-
執行應用程式
該應用程序已準備好在 iPhone,iPad 或 iOS 模擬器上構建和運行。您應該可以從“視頻雲”庫中播放視頻。
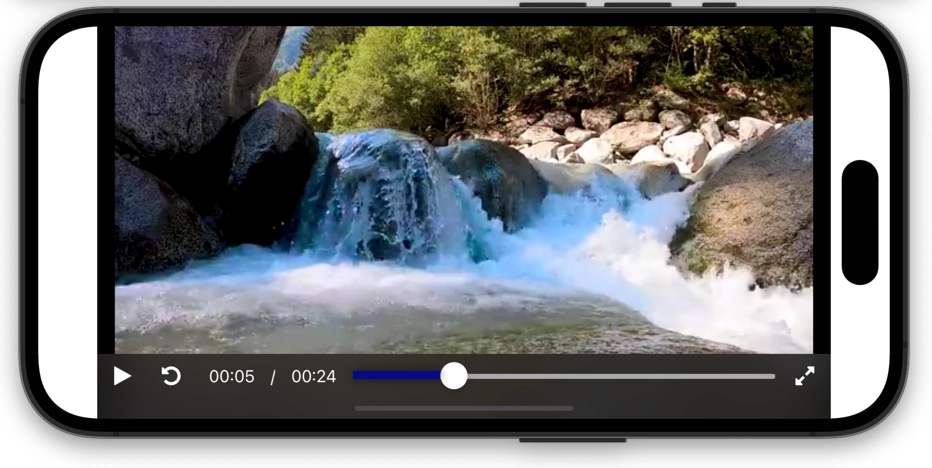
有關更多詳細信息,請查看 適用於 iOS 示例的 Brightcove Player SDK 。
該應用程序已準備好在 iPhone,iPad 或 iOS 模擬器上構建和運行。您應該能夠播放數組中定義的視頻。

有關更多詳細信息,請查看 適用於 iOS 示例的 Brightcove Player SDK 。
